DIY // CACTUS GLASS VOTIVE

DIY Copper cactus glass votive by Isoscella

Cacti are seriously on trend at the moment. I've seen so many cactus-related DIY's out there and have been desperate to try one for myself. So after handing in my case study report on Friday, I took most of the weekend off from work and made it my mission (in between enjoying the sunshine!) to find myself a little DIY project. Whilst looking for inspiration, I came across these beautiful cactus wine glasses on Urban Outfitters and just knew that a cactus print, using copper glass paint, would look great on a glass candle votive. Keep reading to find out what I used and how I did it...

the What.jpg

Glass Votive  |  Copper Glass Paint  |  Paint Brush

DIY Copper cactus glass votive by Isoscella

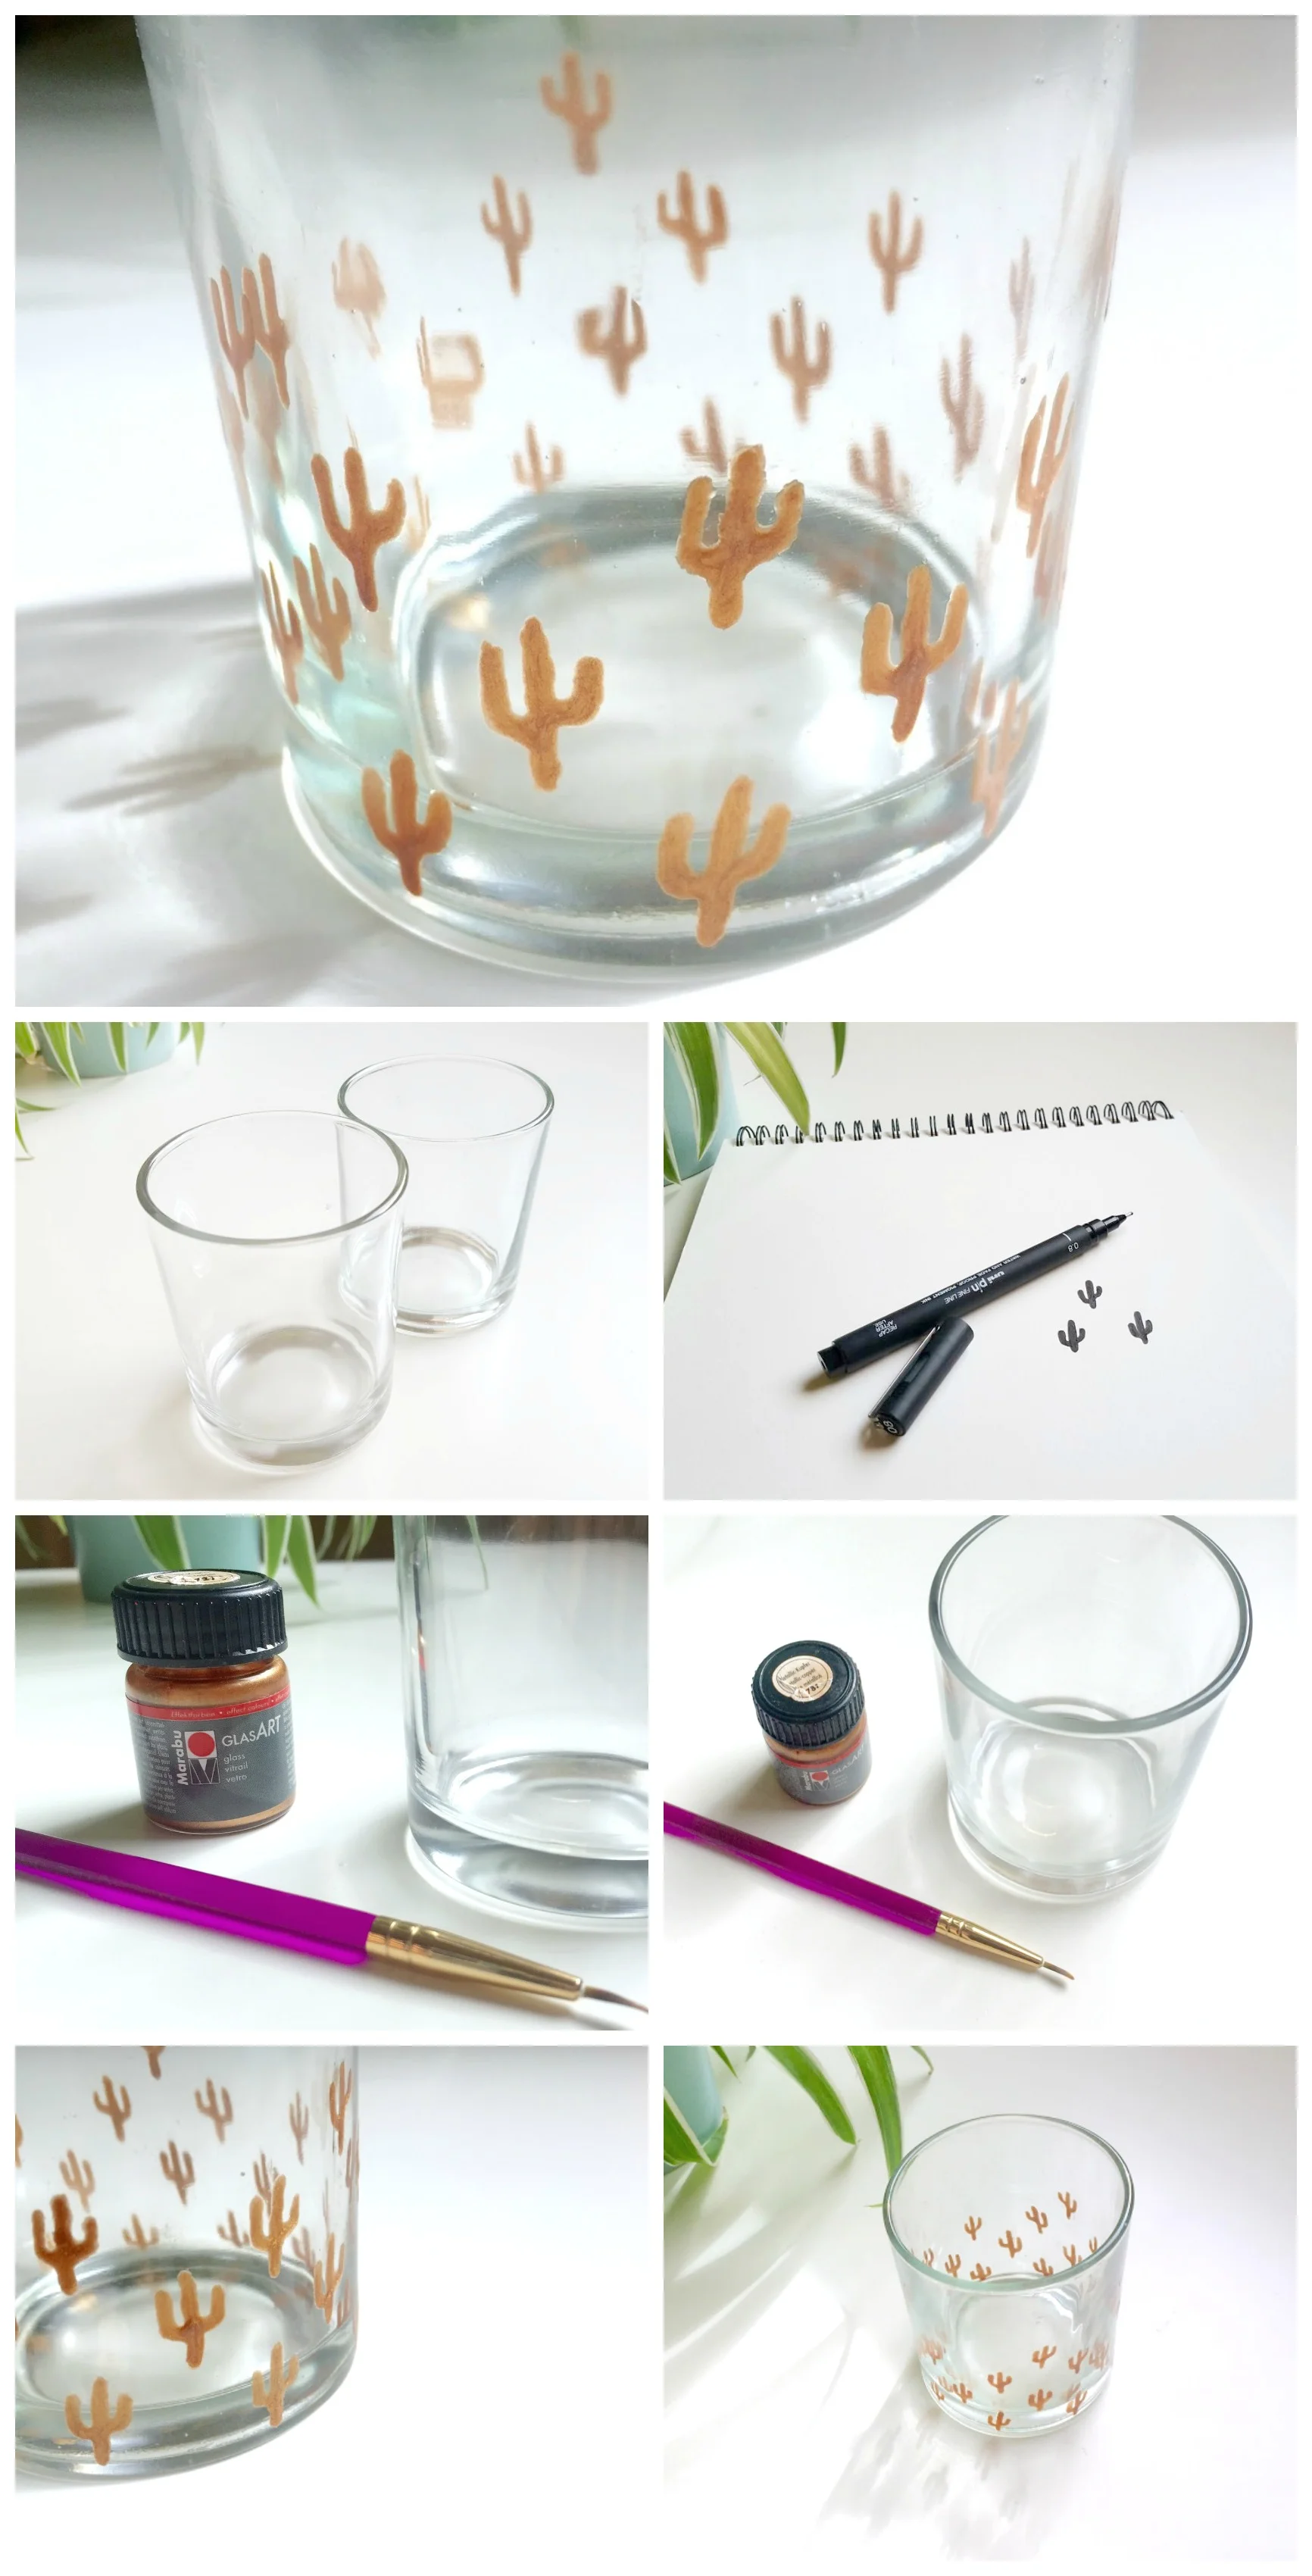
1. Grab some old glass votives. I found mine on sale in a craft shop for just 80p each (bargain!). They were a little scratched and dirty but after a good wash with warm water, I'm considering them as just having a little 'character'.

2. Practice drawing cacti on paper. Whilst those are drying, grab yourself some paper and start drawing out some cacti to copy.

3. Use the glass paint and a paint brush to paint on your cacti. I started right at the bottom and went all the way around painting cacti in regular increments. I then went around painting cacti above and in between each of these. This paint is pretty transparent so after painting on my outline I dabbed paint on in between to get it as opaque as possible.

4. Leave to dry thoroughly. I left mine to dry overnight and whilst the paint was still very wet turned it up side down every now and again to stop the paint from accumulating in certain places.

5. Pop a candle in and enjoy the cacti-ey shadows that this quick and easy DIY creates!

DIY Copper cactus glass votive by Isoscella

Are you as obsessed with this cacti print as me?

Let me know in the comments below!

In Tags
Comment
Share

DIY // HEN PARTY KEEPSAKES

DIY Hen Party Keepsakes by Isoscella

As I've mentioned in a previous post, for my sister's hen or bachelorette party I decorated and filled gift bags for each of the hens. I was really pleased with how they turned out and one of the items that the hens were most impressed with was a little keepsake that I made. I'm such a sentimental person that for me a little something to keep from the weekend (aside from a hangover) was essential. So, I decided to go back to my clay-ey roots (I do love a clay craft!) and make some rustic-inspired hanging hearts for everyone; with the bride and groom's initials imprinted on for the bride-to-be and 'hen' imprinted on it for the hens. Keep reading to find out what I used and how I did it...

DIY Hen Party Keepsakes by Isoscella

Air dry clay  |  Rolling pin  |  Alphabet Stamp  |  Heart cutter  |  Straw |  Twine  |  Matte Clear Sealer

DIY Hen Party Keepsakes by Isoscella

1. Roll out some clay and cut out a heart shape using a cutter. I rolled out my clay until it looked as though it was about half a centimetre thick as I wanted them to be quite delicate looking but not so thin that they would be brittle. To make this precise, place two pieces of card (which are your desired thickness) either side of your clay as you roll.

DIY Hen Party Keepsakes by Isoscella

2. Make a hole through the clay at the top of the heart with a straw. I used a run of the mill drinking straw here and twisted it as I pressed down to help cleanly remove the clay from the middle.

DIY Hen Party Keepsakes by Isoscella

3. Gently imprint the clay with the alphabet stamps. I started off doing this trying to line the stamps up so that the letters were perfectly in line however I realised after a few failed attempts that it looked really nice a little imperfect. I also really liked the square imprint around each letter. 

DIY Hen Party Keepsakes by Isoscella

4. Leave to dry thoroughly before sanding the edges until smooth. I left these to dry for a couple of days (mainly because I went to stay at my parents) but they probably would have dried overnight. Once I returned, I sanded the edges with a damp nail file (this helps control the dust a bit!).

DIY Hen Party Keepsakes by Isoscella

5. Spray with several thin layers of varnish and once dry, add some twine to hang them from. I used a matte varnish to finish these off as I wanted them to keep them looking unpolished and used twine for a finished rustic look.

...and thats it!

Is this something you would make for your hen party gift bags?

I'd love to hear what you think in the comments below!

In Tags
Comment
Share

DIY // HEN PARTY GIFT BAGS

DIY Hen Party Gift Bags - Isoscella

Being Maid of Honour or Chief Bridesmaid is a big responsibility. For me, one of the biggest responsibilities has been organising my sister's Hen (or Bachelorette) Party. As a bit of a sun seeker, I knew she would really appreciate going abroad and as a huge fan of Spain, Madrid felt like the perfect destination. So a few weekends ago, a group of nine of us jetted off for a long weekend of sun, sangria and tapas! And I'm so pleased (and relieved!) to say that it all went smoothly; she had a brilliant time, the weather was amazing, the apartment was really central and the hen party games and gift bags that I put together went down a treat.  

DIY Hen Party Gift Bags - Isoscella

I put a lot of time and effort into the gift bags and tried to keep the price per bag as reasonable as possible (I was paying for it all myself after all!). Before I started, I scoured Pinterest for inspiration and if you follow Isoscella, you might remember my five faves friday post of DIY Hen Party Ideas, which came about because of this. Now that the hen party is over, I am SO pleased to be able to share with you what I did for the gift bags.

DIY Hen Party Gift Bags - Isoscella

In terms of the bags themselves, I searched high and low for brown paper gift bags but couldn't get my hands on any. Instead, I found these lovely pastel coloured paper bags in Hobbycraft. To decorate them, I used my alphabet stamping set to stamp 'hen' and 'bride to be' on them before using a black fine liner to add some decorative leaves around it.

Gift Bags  |  Alphabet Stamp Set  |  Black Fine Liner

DIY Hen Party Gift Bags - Isoscella

What's a hen party gift bag without a little alcoholic tipple?! But how do you put a shot in a gift bag and then transport it to an airport without any accidents?! Two extremely good questions that had me stumped for quite some time. That is, until I found some great mini plastic bottles, for just about 30p each, online. Although I could definitely have left them as they were, using some geometric washi tape and a black fine liner, I chose to add some cute 'Drink Me' labels to them.

Clear Plastic Bottles  |  Pink Cava  |  Washi Tape  |  Black Fine Liner

DIY Hen Party Gift Bags - Isoscella

Now I read in several places that beauty and fragrance companies sometimes give you free samples in the name of 'free advertising'. I was quite nervous about approaching different counters - on reflection I think I was worried that the sales person would look down their nose at me and consider me a bit of a cheapskate - but I went ahead and did it and I'm so glad I did. The sales people in Debenhams and Boots, were just lovely and the hens were so impressed with the samples.

Clarins  |  Benefit  |  Clinique

DIY Hen Party Gift Bags - Isoscella

It's a real tradition in the UK (it's probably similar elsewhere?) to have the hens wearing some kind of sash, t-shirt or costume. However, my sister isn't really into that kind of thing (and neither am I truth be told!) so instead I thought a floral headband (which my sister just loves!) would be a more subtle and classy way to do the whole matching accessory thing. I had a look in some accessory shops but they at least £5 each - great if you're just buying one but definitely not great if you're buying nine! Thankfully Amazon came to the rescue and I managed to get hold of a set of 12 headbands in various colours.

Floral Headband

DIY Hen Party Gift Bags - Isoscella

Photos are an absolute must at any hen or bachelorette party and if like my sister, your bride-to-be loves a good #selfie, then you can't go wrong with adding a few photo props to each gift bag. I found these photo props on Amazon pretty last minute but thanks to having a Prime account managed to get them the very next day (at no extra charge either!). They were great fun at the hen party as well and provided us with lots of excellent drunken photos. 

Photo Props

DIY Hen Party Gift Bags - Isoscella

I knew my sister wouldn't want to be carrying or wearing any penis memorabilia about in Madrid, however my friends reminded me that some form of penis presence at a hen party was a must. So, as a compromise, I found some multi-coloured willy straws (which were disturbingly detailed - look at those veins haha!) and popped one into each of the hen bags. Yes, immature, but yes, hilarious.

Multi-Coloured Willy Straws

DIY Hen Party Gift Bags - Isoscella

I'm such a sentimental person, so for me, a little keepsake from the hen weekend was essential. I wanted to make something for everyone, to both keep costs down, and also because then I could customise it, so using air dry clay and an alphabet stamp kit, I made simple plain white hanging hearts with the bride and groom's initials imprinted on it for the bride-to-be and 'hen' imprinted on it for the hens. If you fancy having a go at these yourself, be sure to stay tuned as I will be positing a full tutorial on here very soon.

Air Dry Clay  |  Alphabet Stamp Kit  |  Matte Clear Sealer  |  Twine

DIY Hen Party Gift Bags - Isoscella

I wanted to include a couple of other things and so dropped into each bag some LoveHeart sweets, plasters (for any blisters from all the sightseeing) and pain killers (for any hangovers!). Although these took a lot of time and effort (and caused me a lot of stress!), they were really cost effective and just SO worth it in the end.

What do you think of my DIY hen party gift bags?

Would you put anything different in?

DIY // POM POM WALL HANGING

DIY pom pom wall hanging by isoscella

This is a DIY that I made and photographed absolutely ages ago but never actually got around to posting on here. It's probably one of my favourite, and definitely one of my most elaborate projects, to date. I made it around the time I discovered you could make pom poms with a fork and came about after I found some command hooks. Renting in a flat is always a bit of an issue when it comes to decorating, but with these little stick on hooks (which promise not to pull paint off when you remove them) you can hang whatever you want, wherever you want. Perfect for filling up those bare walls whilst keeping them nail free and perfect for filling the space above my bed with a DIY project! 

I have to admit that I had a couple of disasters with this project along the way; the first involved dropping the finished thing so that it became a huge tangled mess which needed completely rethreading, and the second involved a wonderful friend of mine trying to help me untangle it before accidentally dipping it in her cup of tea (it was hilarious!). So I really feel like I've been through it with this project and feel even more pleased than normal that I managed to complete it!

DIY pom pom wall hanging by Isoscella

Pom poms  |  Cotton thread  |  Needle  |  Superglue  | Pole or bamboo cane  |  Craft knife  |  Paint

DIY pom pom wall hanging by Isoscella

1. Cut off approximately 35 inches of cotton from the bobbin. 

2. On the cotton, mark 2.5 inches in, and then every 5 inches until you reach 32.5 inches.

DIY pom pom wall hanging by Isoscella

3. Tie a knot where the first mark is, several times and in the same place.

4. Thread your cotton through a needle at the other end and secure it with a single knot.

DIY pom pom wall hanging by Isoscella

5. Push your needle through a pom pom.

6. Pull the pom pom down the thread until it is near the knot.

DIY pom pom wall hanging by Isoscella

7. Add a dab of super glue to the knot.

8. Pull the pom pom all the way down against the knot.

DIY pom pom wall hanging by Isoscella

9. Repeat steps 3-8 until you have a total of 7 pom poms on your cotton at 5 inch intervals.

10. Repeat this process until you have 7 garlands, each with 7 pom poms on. Cut off any excess thread below the first pom pom.

DIY pom pom wall hanging by Isoscella

11. Take a pole or bamboo cane and carefully trim it to approximately 35 inches in length.

12. On the pole, mark 2.5 inches in, and then every 5 inches until you reach 32.5 inches.

DIY pom pom wall hanging by Isoscella

13. On each mark, create a small groove to hold the thread in place.

14. Paint or spray paint the pole if necessary.

DIY pom pom wall hanging by Isoscella

15. Tie each garland to the pole on each of the grooves.

16. Tie a length of wool to each end of the pole and hang.

DIY pom pom wall hanging by Isoscella

I'm so pleased I persisted with this project. At one point, I really was ready to throw it all in the bin. But it's finished and I love it. I'm really impressed with those hooks as well (you'd think I was being paid to say this haha!) but a few months later and it's still hanging. Fingers crossed they come off as easily as they promise...!

As always I love to hear what you think so please do leave a comment below!

In Tags
Comment
Share